Project #0 - C++ Primer
Do not post your project on a public Github repository.
Overview
All the programming projects this semester will be written on the BusTub database management system. This system is written in C++. To ensure that you have the necessary C++ background, we are requiring everyone to complete a simple programming assignment to assess your knowledge of basic C++ features. You will not be given a grade for this project, but you are required to complete the project with a perfect score before being allowed to proceed in the course. Any student that is unable to complete this assignment before the deadline will be asked to drop the course.
All of the code in this programming assignment must be written in C++. The projects will be specifically written C++17, but we have found that it is generally sufficient to know C++11 for the rest of the semester. If you have not used C++ before, here is a short tutorial on the language. More detailed documentation of language internals is available on cppreference. A Tour of C++ and Effective Modern C++ are also digitally available from the CMU library.
There are many tutorials available to teach you how to use gdb effectively. Here are some that we have found useful:
- Debugging Under Unix: gdb Tutorial
- GDB Tutorial: Advanced Debugging Tips For C/C++ Programmers
- Give me 15 minutes & I'll change your view of GDB [VIDEO]
This is a single-person project that will be completed individually (i.e. no groups).
- Release Date: Aug 28, 2022
- Due Date: Sep 11, 2022 @ 11:59pm
Project Specification
In this project, you will implement a key-value store backed by a concurrent trie. Tries are an efficient ordered-tree data structure for retrieving a value for a given key. To simplify the explaination, we will assume tha the keys are all non-empty variable-length strings but in practice they can be any arbitrary type.
Each node in a trie stores a single character of a key and can have multiple child nodes representing different possible next characters. When the end of a key is reached, a flag is set to indicate that its corresponding node is an end node.
In the example below, the trie is storing the keys HELLO, HAT, and HAVE.

The key-value store you will implement can store string keys mapped to values of any type. The value of a key is stored in the node representing the last character of that key (aka terminal node). For example, consider inserting kv pairs ("ab", 1) and ("ac", "val") into the trie.
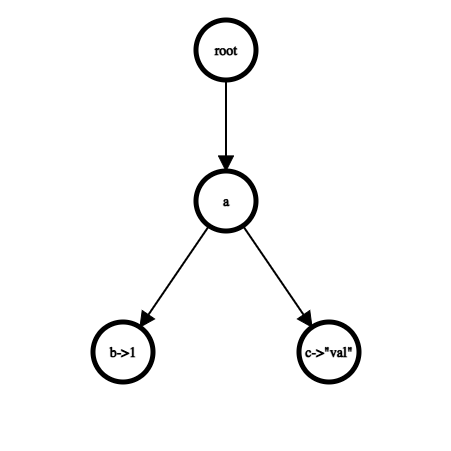
The two keys share the same parent node "a". In the left child node, value 1 corresponding to key "ab" is stored in node "b", and value "val" corresponding to key "ac" is stored in node "c".
Implementation
You will only need to modify a single file p0_trie.h (src/include/primer/p0_trie.h) in the BusTub repository. You will not need to modify any other file in the repository other than test code.
The function prototypes and member variables are specified in the file. The project requires you to fill in the implementations of all the constructors, destructors, and member functions. You can add any additional helper functions and member variables if you see fit, but do NOT modify existing functions and variables.
The instructor and TAs will NOT provide any assistance on C++ questions. You can freely use Google or StackOverflow to learn about C++ and any errors you encounter.
Task #1 - Templated Trie
In this header file, we define three classes that you must implement. We recommend that you first implement the single-threaded version of the Trie class before moving on to concurrent version.
TrieNode Class
The TrieNode class defines a single node in a Trie. A TrieNode holds one character of a key and the is_end_ flag indicates whether it marks the end of a key string. Its child nodes are stored as a mapping of char to unique_ptr<TrieNode>. The key character of a child node is used to access into the children_ map.
Note that the child nodes being unique_ptr means that you need to be careful when assigning them to other variables. The InsertChildNode and GetChildNode both return a pointer to unique_ptr so that you can access unique_ptr's data without making copies or giving up ownership .
Finally, the move constructor TrieNode(TrieNode &&other_trie_node) is used to transfer old TrieNode's unique pointers to a new TrieNode. Make sure you are not making copies of unique pointers when transferring data.
TrieNodeWithValue Class
TrieNodeWithValue class inherits from TrieNode and represents a terminal node (node whose key_char is the ending character of a key) that can hold values of arbitrary type T. Its is_end_ flag is always true.
When you iterate through a trie with a given key and reaches the ending character, you will invoke different constructors for TrieNodeWithValue based on different scenarios (details in Trie Class section). For now, all you need to know is that TrieNodeWithValue(char key_char, T value) constructor creates a TrieNodeWithValue from scratch with the given key character and value. TrieNodeWithValue(TrieNode &&trieNode, T value) constructor takes ownership of the unique_ptrs from given trieNode, and set its own value_ to the given value.
Trie Class
Trie class defines the actual trie that supports insert, search, and remove operations. The root node of a Trie is the starting node for all keys and should not itself store any key character.
Insert
To insert into a trie, you need to first traverse the trie with the given key, inserting TrieNode if it does not exist. Note that inserting a duplicated key is NOT allowed and should return false. Once you reach the ending character of the key, there are three possibilities:
-
A
TrieNodewith this character does not exist. In this case, you can invoke theTrieNodeWithValue(char key_char, T value)constructor to create a new trie node with specified key_char and value. Make use of the fact that aunique_ptrtoTrieNodecan also store aunique_ptrtoTrieNodeWithValue(polymorphism). -
A
TrieNodewith this character exists but is not a terminal node (is_end_ == false). This means that theunique_ptris pointing to aTrieNodeobject instead of aTrieNodeWithValueobject. You need to invoke theTrieNodeWithValue(TrieNode &&trieNode, T value)constructor to convert the oldTrieNodeto a newTrieNodeWithValue. -
A
TrieNodewith this character exists and is already a terminal node (is_end_ == true). This means that theunique_ptris already pointing to aTrieNodeWithValue. You should return false immediately as duplicated keys are not allowed.
Remove
To remove a specified key from trie:
- Traverse the trie based on given key. If the key does not exist, return immediately.
- Toggle the
is_end_flag of terminal node to false. - If this terminal node does not have any children, delete it by removing it from its parent's
children_map. - Travese up the trie and recursively remove nodes that have no children. Stop when you encounter a node that has children.
GetValue
Given a key, return its corresponding value of type T. If key is not found or provided type does not match the value type of the node, set success to false. To check whether the two types are the same, dynamic_cast raw TrieNode pointer to TrieNodeWithValue<T> pointer. If the casted result is nullptr, then type T does not match the value stored in the node.
Task #2 - Concurrent Trie
Your trie will need to ensure that insert, remove, and get operations work in multi-threaded environment. You can use RwLatch (BusTub's implementation of readers-writer lock), or std::shared_mutex from C++ STL to achieve this. This project only requires you to implement simple concurrency control by acquiring a read/write lock over the root node. GetValue function should acquire a read lock over root node (by calling RwLatch's RLock method), whereas Insert and Remove operation should acquire a write lock over root node (by calling RwLatch's Wlock method).
If you are using RWLatch, make sure that you unlock any acquired locks before the function returns to avoid deadlocks.
Instructions
Creating Your Own Project Repository
If the below git concepts (e.g., repository, merge, pull, fork) do not make sense to you, please spend some time learning git first.
Follow the instructions to setup your own PRIVATE repository and your own development branch. If you have previuosly forked the repository through the GitHub UI (by clicking Fork), PLEASE DO NOT PUSH ANY CODE TO YOUR PUBLIC FORKED REPOSITORY! Make sure your repository is PRIVATE before you git push any of your code.
If the instructor makes any changes to the code, you can merge the changes to your code by keeping your private repository connected to the CMU-DB master repository. Execute the following commands to add a remote source:
$ git remote add \
    public https://github.com/cmu-db/bustub.git
You can then pull down the latest changes as needed during the semester:
$ git fetch public
$ git merge public/master
Setting Up Your Development Environment
First install the packages that BusTub requires:
# Linux
$ sudo build_support/packages.sh
# macOS
$ build_support/packages.sh
See the README for additional information on how to setup different OS environments.
To build the system from the commandline, execute the following commands:
$ mkdir build
$ cd build
$ cmake -DCMAKE_BUILD_TYPE=Debug ..
$ make
We recommend always configuring CMake in debug mode. This will enable you to output debug messages and check for memory leaks (more on this in below sections).
$ cmake -DCMAKE_BUILD_TYPE=DEBUG ..
To speed up the build process, you can use multiple threads by passing the -j flag to make. For example, the following command will build the system using four threads:
$ make -j$(nproc)
Testing
You can test the individual components of this assignment using our testing framework. We use GTest for unit test cases. There is one file that contain tests for all three classes:
Starter: test/primer/starter_trie_test.cpp
You can compile and run each test individually from the command-line:
$ cd build
$ make starter_trie_test
$ ./test/starter_trie_test
You can also run make check-tests to run ALL of the test cases. Note that some tests are disabled as you have not implemented future projects. You can disable tests in GTest by adding a DISABLED_ prefix to the test name.
These tests are only a subset of the all the tests that we will use to evaluate and grade your project. You should write additional test cases on your own to check the complete functionality of your implementation.
Make sure that you remove the DISABLED_ prefix from the test names otherwise they will not run!
Formatting
Your code must follow the Google C++ Style Guide. We use Clang to automatically check the quality of your source code. Your project grade will be zero if your submission fails any of these checks.
Execute the following commands to check your syntax. The format target will automatically correct your code. The check-lint and check-clang-tidy targets will print errors that you must manually fix to conform to our style guide.
$ make format
$ make check-lint
$ make check-clang-tidy-p0
Memory Leaks
For this project, we use LLVM Address Sanitizer (ASAN) and Leak Sanitizer (LSAN) to check for memory errors. To enable ASAN and LSAN, configure CMake in debug mode and run tests as you normally would. If there is memory error, you will see a memory error report. You are also welcome to use Valgrind to check for memory errors. Note that for macOS users, neither leak sanitizer and Valgrind will work, and they can still use AddressSanitizer.
Run Valgrind with this command:
valgrind \
    --error-exitcode=1 \
    --leak-check=full \
    ./test/starter_trie_test
Development Hints
Instead of using printf statements for debugging, use the LOG_* macros for logging information like this:
LOG_INFO("# Pages: %d", num_pages);
LOG_DEBUG("Fetching page %d", page_id);
To enable logging in your project, you should add -DCMAKE_BUILD_TYPE=Debug to CMake or enable debug mode in your IDE.
The different logging levels are defined in src/include/common/logger.h. After enabling logging, the logging level defaults to LOG_LEVEL_INFO. Any logging method with a level that is equal to or higher than LOG_LEVEL_INFO (e.g., LOG_INFO, LOG_WARN, LOG_ERROR) will emit logging information. Note that you will need to add #include "common/logger.h" to any file in which you want to make use of the logging infrastructure.
We encourage you to use gdb to debug your project if you are having problems.
Post all of your questions about this project on Piazza. Do not email the TAs directly with questions.
Grading Rubric
In order to pass this project, you must ensure your code follows the following guidelines:
- Does the submission successfully execute all of the test cases and produce the correct answer?
- Does the submission execute without any memory leaks?
- Does the submission follow the code formatting and style policies?
Note that we will use additional test cases to grade your submission that are more complex than the sample test cases that we provide you.
Late Policy
There are no late days for this project.
Submission
You will submit your implementation to Gradescope:
You only need to include the following files with their full path in your submission zip file:
- src/include/primer/p0_trie.h
Alternatively, running this zip command from your working directory (aka bustub, bustub-private, etc.) will create a zip archive called project0-submission.zip that you can submit to Gradescope. You can also put this command in a bash file and run the bash file to make things easier for you.
$ zip project0-submission.zip \
    src/include/primer/p0_trie.h
You can verify the contents of your file using the unzip command. The output of this command should look something like this:
$ unzip -l project0-submission.zip
Archive:  project0-submission.zip
 Length      Date    Time    Name
--------  ---------- -----   ----
    4465  2020-08-25 19:25   src/include/primer/p0_trie.h
--------                     -------
    4782                     1 files
Although you are allowed submit your answers as many times as you like, you should not treat Gradescope as your only debugging tool. Most students submit their projects near the deadline, and thus Gradescope will take longer to process the requests. You may not get feedback in a timely manner to help you debug problems. Furthermore, the output from Gradescope is unlikely to be as informative as the output from a debugger (like gdb), provided you invest some time in learning to use it.
CMU students should use the Gradescope course code announced on Piazza.
Collaboration Policy
- Every student has to work individually on this assignment.
- Students are allowed to discuss high-level details about the project with others.
- Students are not allowed to copy the contents of a white-board after a group meeting with other students.
- Students are not allowed to copy the solutions from another colleague.
WARNING: All of the code for this project must be your own. You may not copy source code from other students or other sources that you find on the web. Plagiarism will not be tolerated. See CMU's Policy on Academic Integrity for additional information.