Project #0 - C++ Primer
Do not post your project on a public Github repository.
Overview
All the programming projects this semester will be written on the BusTub database management system. This system is written in C++. To make sure that you have the necessary C++ background, you must complete a simple programming assignment to assess your knowledge of basic C++ features. You will not be given a grade for this project, but you must complete the project with a perfect score before being allowed to proceed in the course. Any student unable to complete this assignment before the deadline will be asked to drop the course.
All of the code in this programming assignment must be written in C++. The projects will be specifically written for C++17, but we have found that it is generally sufficient to know C++11. If you have not used C++ before, here are some resources to help:
- 15-445 Bootcamp, which contains several small examples to get you familiar with C++11 features.
- Learncpp is a useful resource that includes quizzes to test your knowledge.
- cppreference has more detailed documentation of language internals.
- A Tour of C++ and Effective Modern C++ are also digitally available from the CMU library.
If you are using VSCode, we recommend you to install CMake Tools, C/C++ Extension Pack and clangd. After that, follow this tutorial to learn how to use the visual debugger in VSCode: Debug a C++ project in VS Code.
If you are using CLion, we recommend you to follow this tutorial: CLion Debugger Fundamentals.
If you prefer to use gdb for debugging, there are many tutorials available to teach you how to use gdb. Here are some that we have found useful:
- Debugging Under Unix: gdb Tutorial
- GDB Tutorial: Advanced Debugging Tips For C/C++ Programmers
- Give me 15 minutes & I'll change your view of GDB [VIDEO]
This is a single-person project that will be completed individually (i.e. no groups).
- Release Date: Jan 16, 2024
- Due Date: Jan 28, 2024 @ 11:59pm
Project Specification
In this project, you will implement an Observed Remove Set (OR-Set), a common Conflict-free replicated data type (CRDT).
Imagine a group of friends is drafting a travel plan together on Google Docs. Everyone is typing, adding pictures, and striking off items all at once. But here's the cool part: there's no stepping on each other's toes. Every change, from a new destination to a deleted activity, seamlessly integrates into the document. This real-time, harmonious editing is the magic of CRDTs at play, transforming a potentially chaotic collaboration into a smooth, enjoyable experience.
In general, Conflict-Free Replicated Data Types (CRDTs) are data structures designed for distributed systems where multiple nodes operate independently without the need for immediate synchronization. These data structures can be updated independently and concurrently across multiple nodes, and still converge to the same state once all updates are propagated and processed. To this end, we need an abstraction with commutative, associative, and idempotent operations, then we could create a Merge method to "eventually" reconcile to a definitive final state.
The OR-Set is a specific type of CRDT that handles the addition and removal of elements in a set. In an OR-Set, each element added to the set is tagged with a unique identifier. When an element is removed, its identifier is moved to a "tombstone" set, instead of being completely deleted. This allows the system to track both the additions and deletions of elements, so we could re-add elements after deletion.
When a concurrent add and remove operation over the same element occur, one among several post conditions can be chosen: add-wins, remove-wins or an error mark. The OR-Set can also be called add-wins set since it always lets add operations win over remove operations. Therefore, the OR-Set always leads to a predictable state.
Resources
- Short paper on the OR-Set. It contains the interface description in Figure 2.
- If you want a gentler intro, check out this video (the link starts when they talk about sets, but start from the beginning if you want the full intro.)
Task #1 - OR-Set
In this task, you will need to modify orset.h and orset.cpp to implement an OR-Set. We suggest you to skim through the above short paper, especially section 4 (no need to implement the optimized version).
To implement add-wins semantics, the OR-Set distinguishes the different add operations on the same element by adding a unique token. This token is stored with the element as a tuple (e,n). Take a look at the GenerateUid() function in the orset_driver.h file to see how a unique token is generated.
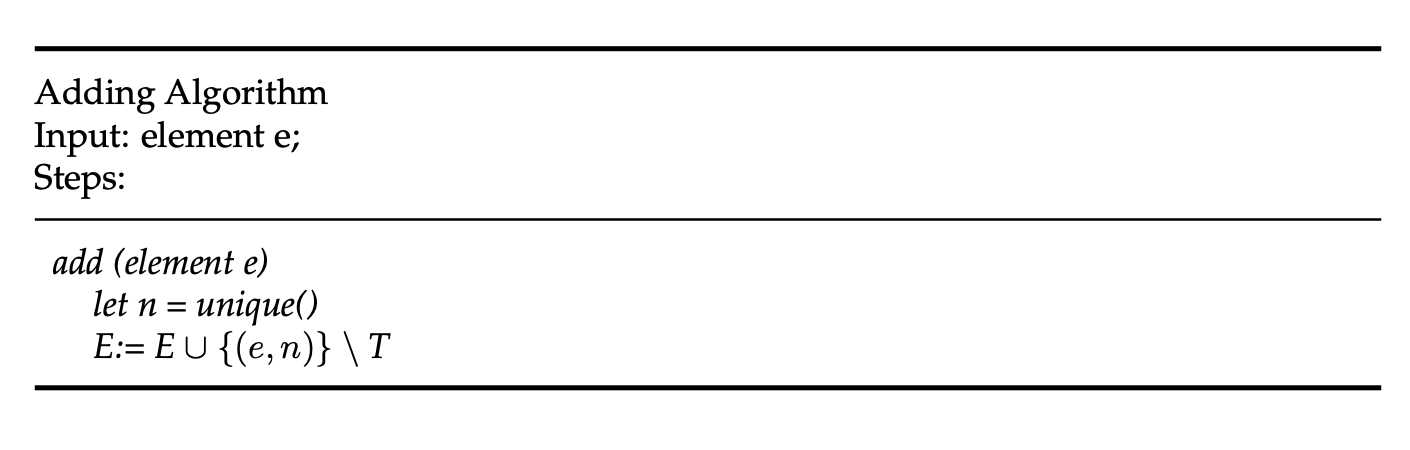
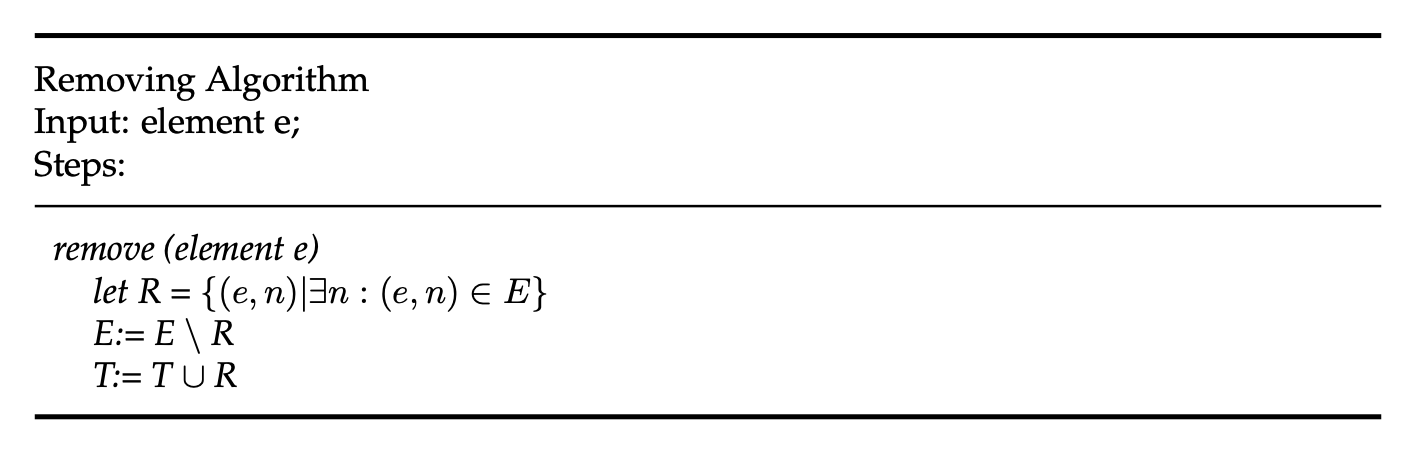
Removals do not only modify the set of elements. Instead, you would also add the corresponding pair (e,n) to the tombstone set. (See figure below)
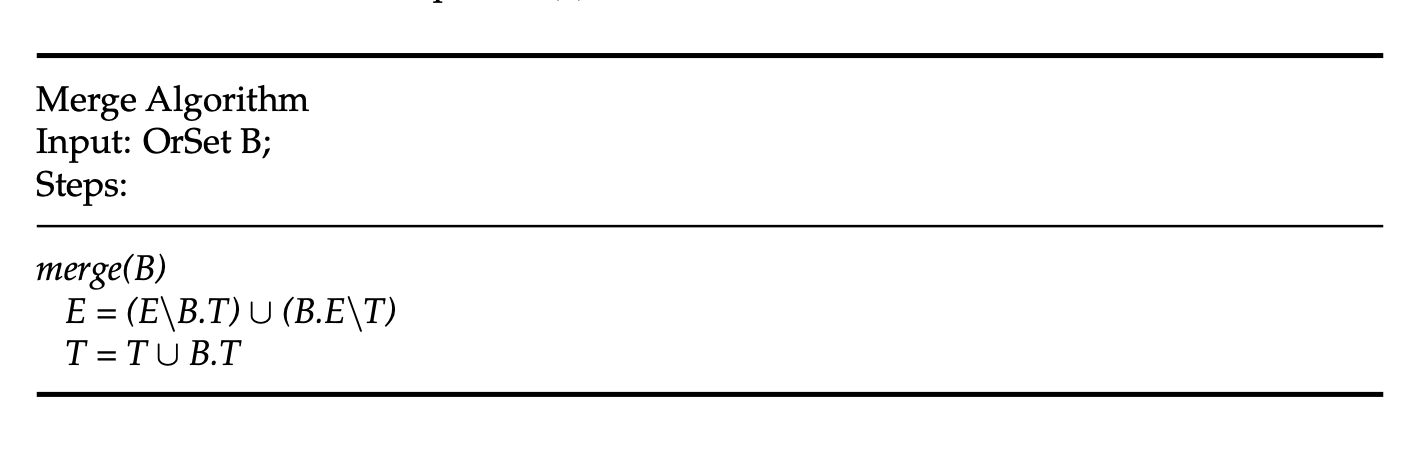
To merge a replica A is merged to a replica B: First, the elements are merged by removing the elements equal to the tombstones from replica B. Second, the set is united with the elements from B that are not included in the tombstones of the set A. After that, the tombstones are updated and therefore united with the tombstones of replica B (see figure below).
Your OR-Set must support five operations:
Contains(elem): Checks if an element is in the set.Add(elem, uid): Adds an element to the set.Remove(elem): Removes an element from the set if it exists.Merge(set): Merge changes from another OR-Set.Elements(): Gets all the elements in the set.
For the full specifications of these operations, please refer to the above short paper and the starter code. We intentionally left some design room for you to think about how to represent your element set and tombstone set. Your implementation should use two sets as in the above examples. Do not use one single std::unordered_set to implement it.
Testing
To test your OR-Set implementation, we provided the ORSetDriver and ORSetNode classes in orset_driver.h/cpp.
* ORSetDriver serves as a mock for a large cluster in a CRDT, which is responsible for creating nodes and managing meta data for synchronization. Most importantly, it generates a globally unique identifier upon each OR-Set Node Add operation.
* ORSetNode is a single node in this distributed system. It's essentially a wrapper around the ORSet you just implemented with methods to communicate with peers via the driver.
All test cases are public in the orset_test.cpp file.
Task #2 - SQL String Functions
Now it is time to dive into BusTub itself! You will need to implement upper and lower SQL functions. This can be done in 2 steps: (1) implement the function logic in string_expression.h. (2) register the function in BusTub, so that the SQL framework can call your function when the user executes a SQL, in plan_func_call.cpp.
To test your implementation, you can use bustub-shell:
cd build
make -j`nproc` shell
./bin/bustub-shell
bustub> select upper('AbCd'), lower('AbCd');
ABCD abcd
Your implementation should pass all 3 sqllogictest test cases.
cd build
make -j`nproc` sqllogictest
./bin/bustub-sqllogictest ../test/sql/p0.01-lower-upper.slt --verbose
./bin/bustub-sqllogictest ../test/sql/p0.02-function-error.slt --verbose
./bin/bustub-sqllogictest ../test/sql/p0.03-string-scan.slt --verbose
Note: If you see BufferPoolManager is not implemented yet. when running sqllogictest, this is normal and you can safely ignore this warning in project 0.
Instructions
Creating Your Own Project Repository
If the below git concepts (e.g., repository, merge, pull, fork) do not make sense to you, please spend some time learning git first.
Follow the instructions to setup your own PRIVATE repository and your own development branch. If you have previuosly forked the repository through the GitHub UI (by clicking Fork), PLEASE DO NOT PUSH ANY CODE TO YOUR PUBLIC FORKED REPOSITORY! Make sure your repository is PRIVATE before you git push any of your code.
If the instructor makes any changes to the code, you can merge the changes to your code by keeping your private repository connected to the CMU-DB master repository. Execute the following commands to add a remote source:
$ git remote add public https://github.com/cmu-db/bustub.git
You can then pull down the latest changes as needed during the semester:
$ git fetch public
$ git merge public/master
Setting Up Your Development Environment
First install the packages that BusTub requires:
# Linux
$ sudo build_support/packages.sh
# macOS
$ build_support/packages.sh
See the README for additional information on how to setup different OS environments.
To build the system from the commandline, execute the following commands:
$ mkdir build
$ cd build
$ cmake -DCMAKE_BUILD_TYPE=Debug ..
$ make -j`nproc`
We recommend always configuring CMake in debug mode. This will enable you to output debug messages and check for memory leaks (more on this in below sections).
Testing
You can test the individual components of this assignment using our testing framework. We use GTest for unit test cases. You can disable tests in GTest by adding a DISABLED_ prefix to the test name. To run the tests from the command-line:
$ cd build
$ make orset_test -j$(nproc)
$ ./test/orset_test
In this project, there are no hidden tests. In the future, the provided tests in the starter code are only a subset of the all the tests that we will use to evaluate and grade your project. You should write additional test cases on your own to check the complete functionality of your implementation.
Make sure that you remove the DISABLED_ prefix from the test names otherwise they will not run!
Formatting
Your code must follow the Google C++ Style Guide. We use Clang to automatically check the quality of your source code. Your project grade will be zero if your submission fails any of these checks.
Execute the following commands to check your syntax. The format target will automatically correct your code. The check-lint and check-clang-tidy targets will print errors that you must manually fix to conform to our style guide.
$ make format
$ make check-clang-tidy-p0
Memory Leaks
For this project, we use LLVM Address Sanitizer (ASAN) and Leak Sanitizer (LSAN) to check for memory errors. To enable ASAN and LSAN, configure CMake in debug mode and run tests as you normally would. If there is memory error, you will see a memory error report. Note that macOS only supports address sanitizer without leak sanitizer.
In some cases, address sanitizer might affect the usability of the debugger. In this case, you might need to disable all sanitizers by configuring the CMake project with:
$ cmake -DCMAKE_BUILD_TYPE=Debug -DBUSTUB_SANITIZER= ..
Development Hints
You can use BUSTUB_ASSERT for assertions in debug mode. Note that the statements within BUSTUB_ASSERT will NOT be executed in release mode.
If you have something to assert in all cases, use BUSTUB_ENSURE instead.
We will test your implementation in release mode. To compile your solution in release mode,
$ mkdir build_rel && cd build_rel
$ cmake -DCMAKE_BUILD_TYPE=Release ..
Post all of your questions about this project on Piazza. Do not email the TAs directly with questions.
TAs will not look into your code or help you debug in this project.
Grading Rubric
In order to pass this project, you must ensure your code follows the following guidelines:
- Does the submission successfully execute all of the test cases and produce the correct answer?
- Does the submission execute without any memory leaks?
- Does the submission follow the code formatting and style policies?
Note that we will use additional test cases to grade your submission that are more complex than the sample test cases that we provide you in future projects.
Late Policy
There are no late days for this project.
Submission
You will submit your implementation to Gradescope:
Run this command in build directory and it will create a zip archive called project0-submission.zip that you can submit to Gradescope.
$ make submit-p0
Although you are allowed submit your answers as many times as you like, you should not treat Gradescope as your only debugging tool. Most students submit their projects near the deadline, and thus Gradescope will take longer to process the requests. You may not get feedback in a timely manner to help you debug problems. Furthermore, the output from Gradescope is unlikely to be as informative as the output from a debugger (like gdb), provided you invest some time in learning to use it.
CMU students should use the Gradescope course code announced on Piazza.
Collaboration Policy
- Every student must work individually on this assignment.
- Students are allowed to discuss high-level details about the project with others.
- Students are not allowed to copy the contents of a white-board after a group meeting with other students.
- Students are not allowed to copy solutions from another person.
- In this project, you are allowed to search on Google or ask ChatGPT high-level questions like "what is CRDT",
"how to use
std::move".
WARNING: All of the code for this project must be your own. You may not copy source code from other students or other sources that you find on the web. Plagiarism will not be tolerated. See CMU's Policy on Academic Integrity for additional information.